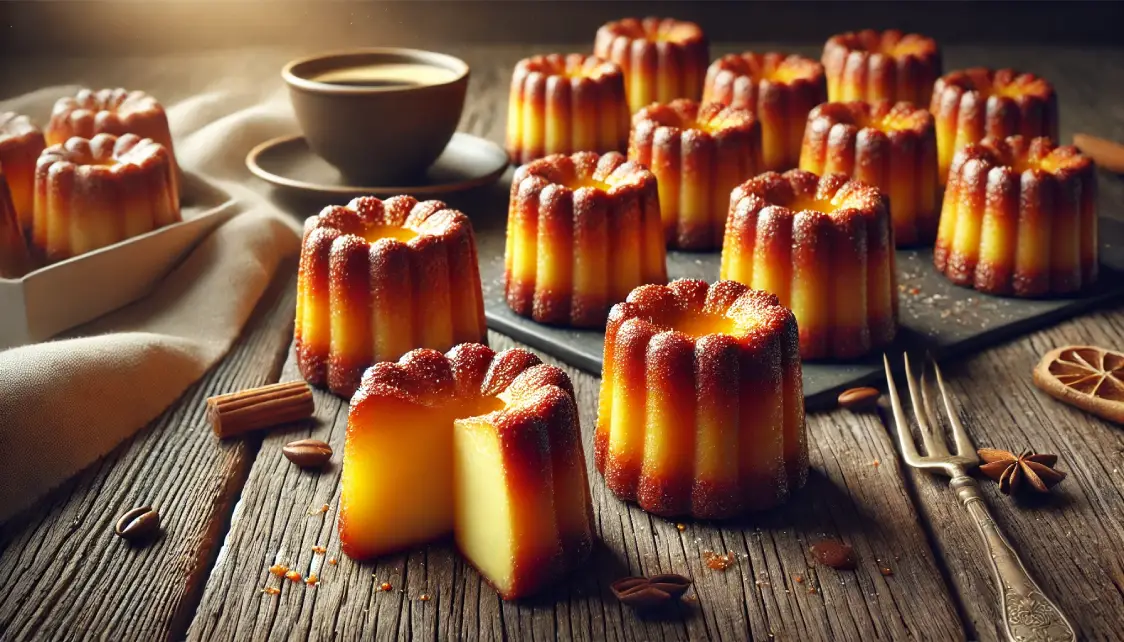
How to Make Canelés: Traditional French Recipe for Bakers
Canelés are a classic French pastry, known for their crispy, caramelized exterior and soft, custardy interior. Originating from Bordeaux, these little delights have gained popularity worldwide for their unique texture and rich flavor.
In this article, we’ll guide you through making canelés at home, with tips for perfecting the recipe.
What Makes Canelés So Special?
Canelés are a delightful combination of texture and flavor. The outer layer is beautifully crisp and caramelized, thanks to the use of beeswax and butter, while the inside remains tender and custard-like. The key to making a perfect canelé lies in the balance of the batter, temperature, and baking time.
The unique flavor of canelés comes from the combination of vanilla and rum, which is soaked into the batter. The rich vanilla flavor pairs beautifully with the slight kick of rum, making these pastries an indulgent treat.
Ingredients for Canelés
To make canelés, you’ll need a few specific ingredients and some specialized equipment:
Ingredients:
- 1 ¼ cups whole milk
- 1 vanilla bean (or 1 teaspoon vanilla extract)
- 2 tablespoons unsalted butter
- 1 tablespoon dark rum
- ½ cup all-purpose flour
- ½ cup granulated sugar
- 2 large eggs
- 1 egg yolk
- Pinch of salt
- 1 tablespoon beeswax (optional, but gives the authentic crispy exterior)
Instructions:
-
Prepare the Molds: Canelé molds are essential for this recipe. Traditional canelé molds are copper, but silicone molds can also be used. Before using the molds, grease them with butter and, if available, beeswax. Beeswax gives the canelés their iconic crispy, caramelized crust.
-
Make the Batter: In a saucepan, heat the milk and vanilla bean (or extract) over medium heat until it just begins to simmer. Remove the vanilla bean and scrape out the seeds, then return the seeds and pod to the milk. Add the butter to the milk mixture and stir until melted. Let the milk cool slightly.
-
Combine the Wet and Dry Ingredients: In a bowl, whisk together the flour, sugar, eggs, egg yolk, and salt. Slowly pour the milk mixture into the dry ingredients, whisking continuously to avoid lumps. Once the batter is smooth, stir in the dark rum.
-
Rest the Batter: Cover the batter and let it rest in the refrigerator for at least 24 hours. This resting period allows the batter to develop a better texture and flavor.
-
Bake the Canelés: Preheat your oven to 450°F (230°C). Pour the batter into the prepared molds, filling them about ¾ full. Place the molds on a baking sheet and bake for 10 minutes at 450°F, then lower the temperature to 375°F (190°C) and bake for an additional 50-60 minutes. The canelés should have a dark, caramelized crust while remaining soft and custardy on the inside.
-
Cool and Serve: Once baked, let the canelés cool in the molds for 10 minutes. Then, remove them from the molds and let them cool completely on a wire rack. Serve at room temperature.
Tips for Perfecting Canelés
Canelés may seem intimidating at first, but with a few tips and tricks, you can create the perfect batch:
1. Use Beeswax for the Authentic Finish
If you want to achieve the signature crispy, caramelized exterior, beeswax is the way to go. Melt a small amount of beeswax and mix it with butter to grease the molds. The beeswax will create a non-stick coating and help the pastries achieve their signature texture.
2. Let the Batter Rest
Resting the batter is crucial to achieving the perfect texture. Let it sit in the refrigerator for at least 24 hours, as this allows the flour to fully hydrate and gives the canelés a custard-like interior.
3. Watch the Baking Temperature
Getting the temperature right is key to achieving the ideal texture. Start with a high temperature to create the caramelized crust, then reduce it to allow the inside to cook gently without overbaking.
4. Use Copper Molds for the Best Results
Traditional copper molds provide the best heat distribution, resulting in an even bake. However, silicone molds can work too if copper molds are unavailable. Just be aware that the texture may not be quite as crisp.
5. Don’t Overfill the Molds
Fill the molds about ¾ full. If you overfill them, the canelés may overflow or fail to develop the characteristic rise and caramelization.
Serving and Enjoying Canelés
Canelés are best enjoyed fresh, ideally within 24 hours of baking. Their unique texture and flavor make them a perfect accompaniment to a cup of coffee or tea. However, they can also be stored for a few days at room temperature.
If you need to store them, place them in an airtight container and consume them within a couple of days to maintain their crispy exterior and soft interior.
Variations of Canelés
While the traditional flavor of canelés is vanilla and rum, there are many ways to experiment with different flavor profiles:
1. Chocolate Canelés
Add finely chopped chocolate to the batter for a rich, decadent twist on the traditional recipe. The chocolate will melt and create a soft, gooey interior.
2. Citrus Canelés
For a refreshing change, add some lemon or orange zest to the batter. The citrus flavor pairs beautifully with the sweetness of the caramelized crust.
3. Spiced Canelés
Experiment with spices like cinnamon or cardamom. These spices add warmth and depth to the flavor of the canelés, making them perfect for fall or winter.
Conclusion
Canelés are a wonderful French pastry that offers a perfect balance of texture and flavor. While they require some patience and attention to detail, the result is worth the effort.
By following the steps and tips in this article, you can master the art of making canelés at home and impress your guests with this elegant treat.